Arduino Nano is now easier than ever
Posted

Back in May, Arduino announced the realease of a new Family of Nanos on the Maker Faire Bay Area. This new Nano family consists of 4 new members:
- Every is the simplest version, almost the same as the well known Nano, but with an ATMega4809 (Cortex-M0+) Microprocessor.
- 33 IoT has an Arm Cortex-M0+ SAMD21 processor, a WiFi/Bluetooth 4.2 module and a 6-axis IMU (Gyroscopes and Accelerometers)
- 33 BLE has a Nordic NRF52840 at 64 MHz and Bluetooth 5.0, but no WiFi nor on-board sensors.
- 33 BLE Sense is the nano-tank with the Nordic NRF52840, BLE 5.0, and as many sensors as they could pack: 9-axis MARG (Gyroscopes, Accelerometers, Compass), a microphone, and sensors for temperature, humidity, pressure, light and even color.
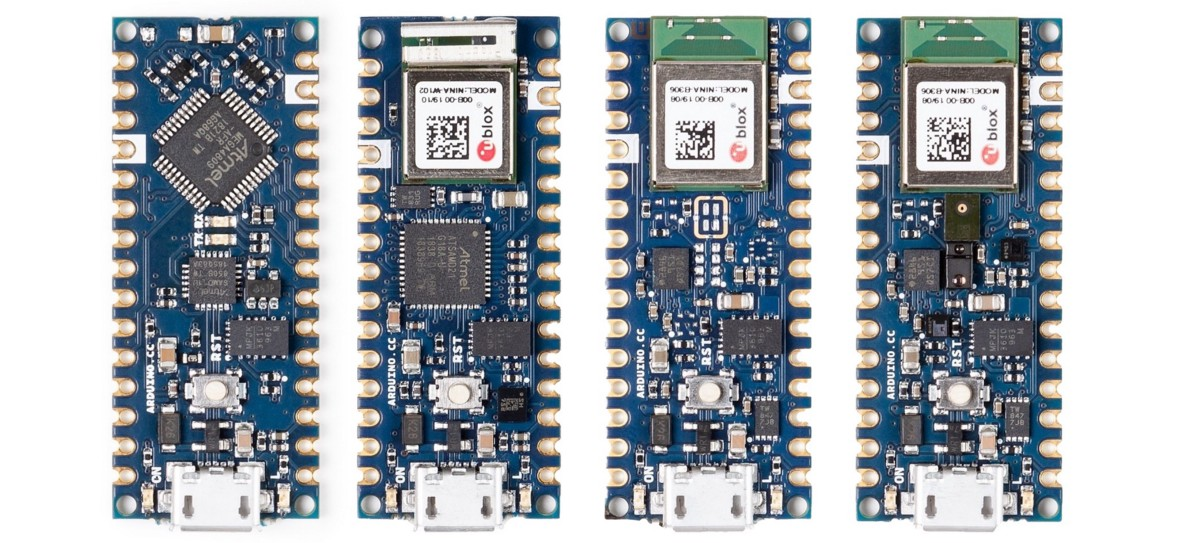
All of them have a micro-USB type B interface, in contrast to the original Nano’s mini-USB. Side to side we can have a better overall picture of their main differences.
| Version | Microprocessor | Clock | Flash | SRAM | Wireless |
|---|---|---|---|---|---|
| Nano | ATMega328 | 16 MHz | 32 kB | 2 kB | N/A |
| Nano Every | ATMega4809 | 20 MHz | 48 kB | 6 kB | N/A |
| Nano 33 IoT | ATSAMD21 | 48 MHz | 256 kB | 32 kB | WiFi, BLE 4.2 |
| Nano 33 BLE | Nordic NRF52840 | 64 MHz | 1 MB | 256 kB | BLE 5 |
| Nano 33 BLE Sense | Nordic NRF52840 | 48 MHz | 1 MB | 256 kB | BLE 5 |
The new 33-series are a huge leap forward, which you can interface with using BLE, and are generally faster (Clock speeds from 48 MHz.)
A bigger jump are the 33 BLEs, with an extended memory up to 1 MB for Flash and 256 kB of SRAM, while using the better performing BLE 5.0.
Only the IoT and Sense versions include sensors on board: a 6-axis IMU (Accelerometer and Gyroscope) for the former, and a 9-axis MARG (Accelerometer, Gyroscope and Compass) and environemental sensors (temperature, pressure, humidity, light, color and a microphone) for the latter.
As noticed the Nano 33 BLE Sense offers the widest range of capabilties for sensing, processing and communication, except for the lack of WiFi. So powerful that you can even deploy AI models using TensorFlow Lite.
I love playing with sensors (specially IMUs) and I immediately wanted the 33 BLE Sense, but its price (from €29 without tax) deterred me, and opted for a Nano 33 IoT (€16), which lacks the environmental sensors and is not as powerful.
It isn’t even needed to connect more elements. It works by merely plugging it to the computer with the micro-USB.
Setting it up is extremely easy thanks to Arduino’s documentation. Just make sure you added the board model using the Boards Manager in the Arduino IDE.
I wanted to play with the on-board inertial sensor, the LSMDS3, so I downloaded the Arduino LSM6DS3 library using the Library Manager in the IDE. This library simplifies everything thanks to its basic, yet useful, set of objects.
Including several libraries for communication and management of the inertial sensors was a must if we wanted to use them with the Arduino. Now I just have to include this simple library in the project and that’s it.
A simple sketch to print out the accelerometer values would look like this:
#include <Arduino_LSM6DS3.h>

void setup() {
  Serial.begin(9600);
}

void loop() {
  float acc_x, acc_y, acc_z;
  IMU.readAcceleration(acc_x, acc_y, acc_z);
  Serial.print(acc_x);
  Serial.print("\t");
  Serial.print(acc_y);
  Serial.print("\t");
  Serial.println(acc_z);
}
This will set the baud rate at 9600 for the serial and will constantly read the accelerometer values.
Let’s make this code a bit more robust by catching errors and setting a delay. This delay will give it some time to put all sensor values together. The IMU sampling rate is locked at 104 Hz. Thus, a simple delay of 10 ms suffices.
#include <Arduino_LSM6DS3.h>

void setup() {
  Serial.begin(9600);
  while (!Serial);
  if (!IMU.begin()) {
    Serial.println("Failed to initialize IMU");
    while (1);
  }
}

void loop() {
  float acc_x, acc_y, acc_z;
  if (IMU.accelerationAvailable()) {
    IMU.readAcceleration(acc_x, acc_y, acc_z);
    Serial.print(acc_x);
    Serial.print("\t");
    Serial.print(acc_y);
    Serial.print("\t");
    Serial.println(acc_z);
  }
  delay(10);
}
If you check your serial monitor in Arduino’s IDE, you’d see something like this:
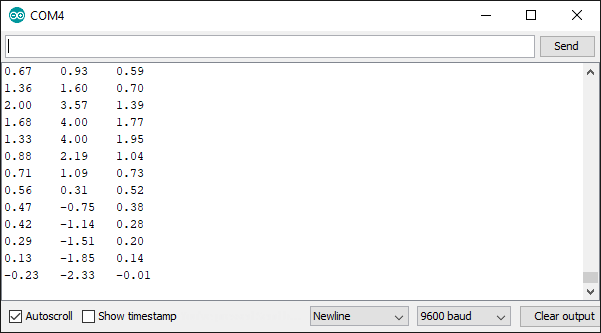
Each stream sends around 18 bytes, because the string has 18 characters (including the endline.)
Every value has a precision of 2 decimals. Not the best. Sure, you can increase the output by defining the number of decimals as a parameter too: Serial.print(acc_x, 4)
But this keeps trimming some data, apart from making the stream even longer.
To make better data transmissions I always opt to send bytes, instead of strings. This really makes a difference.
A single-precision floating-point, used by Arduino, can give you way more than 2 decimals of precision, and you don’t need more than 4 bytes per value.
Just think about it, a character in a string takes one byte. Whereas sending a 32-bit floating value, with its full precision, will take 4 bytes maximum, totalling 12 bytes for our 3 acceleration values at full precision.
More precision with less data load? Yes, please!
Collect all data in a byte array and send it with Serial.write().
#include <Arduino_LSM6DS3.h>

void setup() {
  Serial.begin(9600);
  while (!Serial);
  if (!IMU.begin()) {
    Serial.println("Failed to initialize IMU");
    while (1);
  }
}

void loop() {
  float acc_x, acc_y, acc_z;
  if (IMU.accelerationAvailable()) {
    IMU.readAcceleration(acc_x, acc_y, acc_z);
    byte * ax = (byte*) &acc_x;
    byte * ay = (byte*) &acc_y;
    byte * az = (byte*) &acc_z;
    byte buf[12] = {ax[0], ax[1], ax[2], ax[3],
                    ay[0], ay[1], ay[2], ay[3],
                    az[0], az[1], az[2], az[3]};
    Serial.write(buf, 12);
  }
  delay(10);
}
Now our Arduino Nano 33 IoT will be spitting the acceleration values every 10 ms.
A simple Python script can read these values to confirm it:
import serial
import struct

data_bytes = bytearray(12)
ser = serial.Serial('COM4', 9600)
ser.reset_input_buffer()

while True:
    data = []
    try:
        ser.readinto(data_bytes)
        for i in range(3):
            value, = struct.unpack_from('f', data_bytes, offset=4*i)
            data.append(value)
        print(data)
    except:
        break

ser.close()
The serial module has all the basic functions to read and write through the serial ports of our computer (or their adapted forms.)
The struct module performs conversions between Python and C byte objects. It allows us to convert the streamed bytes back into floats.
First we set the byte array with the line data_bytes = bytearray(12) and notice it will contain 12 bytes, for our 3 floating-points. Not more nor less.
A connection is set with the given port name (here it’s 'COM4') and baud rate (the same set in the Arduino.) We also clean the buffer, with the line ser.reset_input_buffer(), to discard any previous content.
Then, we enter a constant loop, where we ask the bytes from the serial port.
Once it gets the 12 bytes, we read them from 3 equidistant parts to cast them into floats, and store them in a list.
The offset parameter indicates the starting position to read from.
for i in range(3):
    value, = struct.unpack_from('f', data_bytes, offset=4*i)
Finally we print out the list with the three floats to see the accelerometer values in the terminal. A simple Ctrl+C would break it.
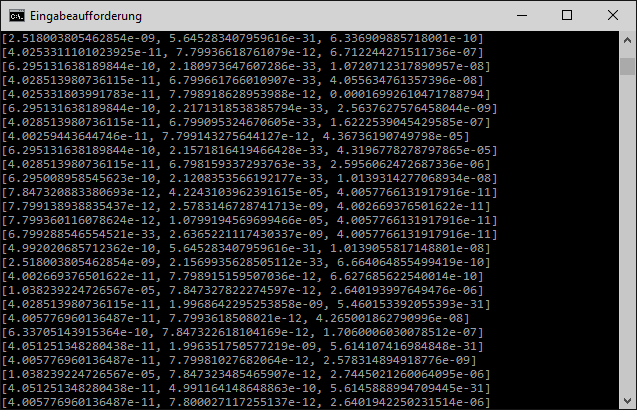
See how much the precision improved? It is a quick-and-dirty script, but it does the job.
You can even build a simple data logger with a time stamp to store all values in a file.
import serial
import struct
import time

data_bytes = bytearray(12)
ser = serial.Serial('COM4', 9600)
ser.reset_input_buffer()

while True:
    data = []
    try:
        ser.readinto(data_bytes)
        for i in range(3):
            value, = struct.unpack_from('f', data_bytes, offset=4*i)
            data.append(value)
        with open("test_data.csv", "a") as f:
            stream_array = [time.time()] + data   # Add time stamp in first column
            f.write(';'.join([str(x) for x in stream_array])+'\n')
    except:
        print("Keyboard Interrupt")
        break

ser.close()
Now I want to use the AHRS package and play with it. Future benchmarks will come, for sure.
Ok, you can imagine more stuff and try it. At least the basics for data retrieval are there and it is as easy as ever with the new tools.
Have fun!