VideoWave
Posted

I want to improve my videos with effects like the documentaries showing animations for audio waves. You know, like the ones with video clips and they display the audio as waves next to or on top of it.
A quick search in internet gave me few options: Adobe Premier, but paying for it? No, thanks. I’m on a budget here. Then I found that FFmpeg has a very neat waveform visualization included. It’s good but doesn’t get the nifty result I want.
In the absence of such tools, I decided to make my own. Something quick, easy and very customizable.
I chose Python, because I don’t have enough time to dedicate to this. Besides, Python has most of the tools that can be used for this kind of application.
This tool ended up being a package I called VideoWave, which you can download from its repository and install it with pip:
git clone git@github.com:Mayitzin/VideoWave.git
cd VideoWave
pip install .
It requires:
- FFmpeg for all video processing.
- Python OpenCV for the image manipulation.
- NumPy for fast operations over data.
- SciPy for specialized DSP.
- Matplotlib as an aid for some visualizations.
To promptly get a new clip with audio waves generated from the audio, we merely use three lines of Python:
from VideoWave import Waver
wave_clip = Waver("clip.mp4")
wave_clip.export("new_clip.mp4")
This will take the original file clip.mp4 and create a new one called new_clip.mp4 showing exactly the same, except for a big audiowave on top of the image following the sound.
It goes from this

to this
How it’s done
I’ll be using an old video clip 27 seconds long at 25 frames per second.
FFmpeg is the superior tool to manage all video processing. Installing it is easy and oh boy! It’s the swiss army knife of video.
A simple call to ffmpeg with the input file gives you a plethora of information.
ffmpeg -i clip.mp4

ffmpeg version N-94566-gddd92ba2c6 Copyright (c) 2000-2019 the FFmpeg developers
  built with gcc 9.1.1 (GCC) 20190807
  configuration: --enable-gpl --enable-version3 --enable-sdl2 --enable-fontconfig --enable-gnutls --enable-iconv --enable-libass --enable-libdav1d --enable-libbluray --enable-libfreetype --enable-libmp3lame --enable-libopencore-amrnb --enable-libopencore-amrwb --enable-libopenjpeg --enable-libopus --enable-libshine --enable-libsnappy --enable-libsoxr --enable-libtheora --enable-libtwolame --enable-libvpx --enable-libwavpack --enable-libwebp --enable-libx264 --enable-libx265 --enable-libxml2 --enable-libzimg --enable-lzma --enable-zlib --enable-gmp --enable-libvidstab --enable-libvorbis --enable-libvo-amrwbenc --enable-libmysofa --enable-libspeex --enable-libxvid --enable-libaom --enable-libmfx --enable-amf --enable-ffnvcodec --enable-cuvid --enable-d3d11va --enable-nvenc --enable-nvdec --enable-dxva2 --enable-avisynth --enable-libopenmpt
  libavutil      56. 33.100 / 56. 33.100
  libavcodec     58. 55.100 / 58. 55.100
  libavformat    58. 30.100 / 58. 30.100
  libavdevice    58.  9.100 / 58.  9.100
  libavfilter     7. 58.100 /  7. 58.100
  libswscale      5.  6.100 /  5.  6.100
  libswresample   3.  6.100 /  3.  6.100
  libpostproc    55.  6.100 / 55.  6.100
Input #0, mov,mp4,m4a,3gp,3g2,mj2, from 'clip.mp4':
  Metadata:
    major_brand     : isom
    minor_version   : 512
    compatible_brands: isomiso2avc1mp41
    encoder         : Lavf56.25.101
  Duration: 00:00:27.15, start: 0.000000, bitrate: 1039 kb/s
    Stream #0:0(und): Video: h264 (Main) (avc1 / 0x31637661), yuv420p, 640x480, 912 kb/s, 25 fps, 25 tbr, 90k tbn, 50 tbc (default)
    Metadata:
      handler_name    : VideoHandler
    Stream #0:1(und): Audio: aac (LC) (mp4a / 0x6134706D), 44100 Hz, stereo, fltp, 125 kb/s (default)
    Metadata:
      handler_name    : SoundHandler
At least one output file must be specified
Perhaps too much information. Call it with the flag -hide_banner if you want to see the basics.
FFmpeg will be our main weapon here, but a little help from Open CV eases the process.
I started by creating a capture object to load the video and get each frame from it:
import cv2
capture = cv2.VideoCapture('clip.mp4')
frames = []
while(capture.isOpened()):
    ret, frame = capture.read()
    if ret is False:
        break
    frames.append(frame)
This gets the video frames only, but not the sound. FFmpeg would easily extract the audio with a simple call.
ffmpeg -i clip.mp4 -f wav -ab 192000 -vn my_audio.wav
But we want it in Python, so let’s use subprocess
import subprocess
subprocess.run(["ffmpeg", "-i", "clip.mp4", "-f", "wav", "-ab", "192000", "-vn", "my_audio.wav"])
The flag -f wav indicates I want a WAV audio format, while -ab 192000 instructs that an audio encoding at 192 kHz is required, and -vn tells it to get rid of any video output. The last bit (my_audio.wav) is the name of the resulting audio file.
Now the video frames are stored in a list frames and the audio is saved in the file my_audio.wav. From the audio data we build the visualization of the sound.
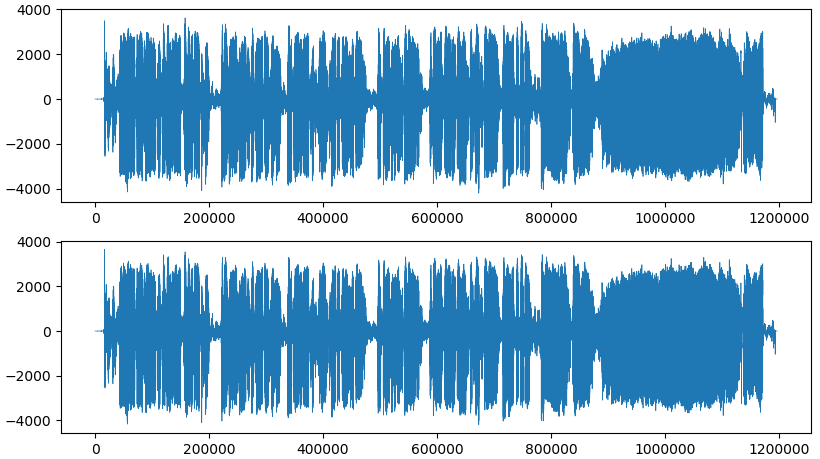
There are two main audio visualizations: either in time domain or in frequency domain. Plotting the sampling of a stereo signal in time domain would look like this:
But I personally prefer the second type, a spectrogram. The spectrogram shows the frequencies at each moment, which, in my opinion, present a nicer wave to visualize.
Spectrograms show changes of the sound like the audio bars of your old audio systems. Yeah, I think I want that. To achieve it I use the spectrogram function of the SciPy package.
First we load the audio data from the file using the submodule scipy.io.wavfile
import scipy
samplerate, data = scipy.io.wavfile.read("my_audio.wav")
This gives us the main information. If our audio is stereo we would get a data Numpy array of size (N, 2), where N is the number of samples. The audio in the video clip I chose is quite similar in both channels, so I will use either of them to create the audio wave.
Next the spectrogram is computed with scipy.signal.spectrogram
from scipy.signal import spectrogram
_, _, sg_img = spectrogram(data[:, 0], samplerate)
sg_img /= sg_img.max()    # Normalize data
I normalized the resulting spectrogram, so that all values are between 0 and 1. The spectrogram looks like this:
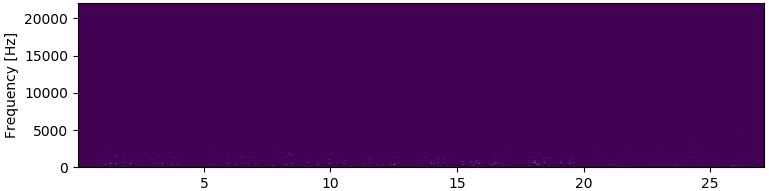
Ahm… nothing here, apparently.
Wait, I see some dots at the bottom of the image. Could it be that these impulses at lower frequencies are too blunt making the rest almost invisible?
I binarize the image using a threshold equal to 0.001, so that every value above 0.001 will be set to 1, and all others to 0.
_, th_bin = cv2.threshold(sg_img, 1e-3, 1.0, cv2.THRESH_BINARY)
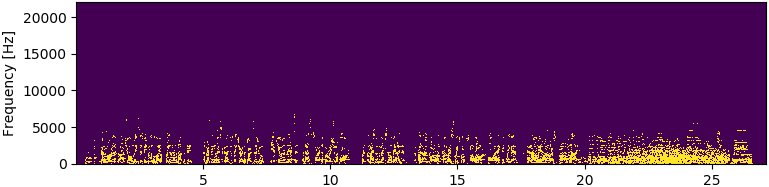
And there they are!
It seems that the audio has very low frequencies, and it makes total sense, as the voice frequency spans from 300 to 3400 Hz. There might be some higher frequencies, and playing with the threshold would reveal them. But I also saw some noise in it. I think the spectrogram with this dynamics works for me.
A small observation confirms the spectrogram built from 27 seconds (X-axis) and up to 22 kHz (Y-axis), but the higher frequencies are mostly empty, so I’ll remove them with a row-wise (is that a word?) non-zero detection over the binarized spectrogram.
nzrs = np.nonzero(th_bin.sum(axis=1))
freq_min = np.min(nzrs)
freq_max = np.max(nzrs)
This gives upper and lower limits of the information. Everything outside those limits has no spikes. In this example is between 0 and 6775 Hz.
So, I cropped the original spectrogram to fit those limits and thresholded it using a truncate type, in order to keep the values between 0.001 and 1.0
_, sg_img_trunc = cv2.threshold(sg_img[freq_min:freq_max, :], 1e-3, 1.0, cv2.THRESH_TRUNC)
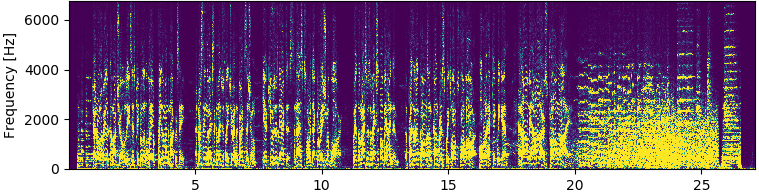
This is a much more responsive image than the original spectrogram and almost every part of it is enriched with data.
Now we have to decide the resolution of the wave. In my case I think 30 lines per wave are fine. This means I’ll have 30 bars jumping at the sound of the clip. I know the video has 675 frames, thus we build 675 waves, each with 30 bits of resolution.
We then resize the specrogram to 675x30 and normalize it again, so that all values are between 0 and 1.
num_bits = 30
num_frames = len(frames)
wave_shape = (num_frames, num_bits)
sg_img_trunc = cv2.resize(sg_img_trunc, wave_shape, interpolation=cv2.INTER_AREA)

The shrunk image has substantially lost resolution, but it’s fine, we have what we need.
There are 675 frames in this video clip, so I use each column of the spectrogram to form a frame’s wave.
With the help of OpenCV a wave is created from each column and drawn on top of its corresponding frame.
Here I draw the 30 bits per frame running horizontally across the half of the screen. Low frequencies are at the left of the screen and I will mirror the jumps above and below the middle of the screen.
frame_size = (640, 480)
x_line = np.linspace(frame_size[0], frame_size[1], num_bits, dtype='int')
color = (255, 255, 255)
for i, frame in enumerate(frames):
    for bit in range(num_bits):
        p1 = (x_line[bit], frame_size[1]//2 - int(100*sg_img_trunc[i][bit]))   # Up
        p2 = (x_line[bit], frame_size[1]//2 + int(100*sg_img_trunc[i][bit]))   # Down
        cv2.line(frame, p1, p2, color, thickness=5, lineType=cv2.LINE_AA)
The properties of the wave can be easily changed in the call to cv2.line
It’s not enough to create the new frames, we have to make a video out of that, right? And here I faced my biggest struggle.
OpenCV already has a very helpful function to compile your video. Just create a VideoWriter and add each created frame to it. OpenCV will make the video for you… or so I thought.
To make a VideWriter you need to specify the fourcc code of codec that will compress your images and turn them into a video.
I really tried all types of codes and just kept hitting codec errors all the time. Even though I would like to know more about the video processing, I cannot afford to spend more time with it, and decided to go for the easy way-out.
Each constructed frame is saved as a PNG image in a folder, then I used FFmpeg to bind them together with the sound.
It is taking too much space to save each frame (especially the bigger resolutions), but it does the trick for now. Let’s append them to a new empty list:
frame_size = (640, 480)
x_line = np.linspace(frame_size[0], frame_size[1], num_bits, dtype='int')
color = (255, 255, 255)
new_frames = []
for i, frame in enumerate(frames):
    for bit in range(num_bits):
        p1 = (x_line[bit], frame_size[1]//2 - int(100*waves[i][bit]))   # Up
        p2 = (x_line[bit], frame_size[1]//2 + int(100*waves[i][bit]))   # Down
        cv2.line(frame, p1, p2, color, thickness=5, lineType=cv2.LINE_AA)
    new_frames.append(frame)
Now, with FFmpeg we put the built frames and sound together. Again, we wrap the call with subprocess
path_to_frames = './frames/%03d.png'
audio_file = 'my_audio.wav'
fps = 25
dimensions = 'x'.join([str(s) for s in size])
video_codec = 'libx264'
quality = 15
new_video_clip = 'new_clip.mp4'
completed_process = subprocess.run(['ffmpeg', '-i', path_to_frames, '-i', audio_file, '-r', str(fps), '-s', dimensions, '-vcodec', video_codec, '-crf', str(quality), '-pix_fmt', 'yuv420p', new_video_clip])
Et voilà! We have a brand new clip with audio waves on top of it.
What’s next
There’s plenty of room for improvement, like accelerating the process with the correct settings used in the 4-character code of codec. Those annoying fourcc would solve a bunch.
It is worth to have a look at the ffmpeg-python binding for FFmpeg. Perhaps there is something to adapt and improve it.
And, naturally, the representation of the waves has to be much more customizable: colors, shapes, sizes, spacing, etc.
For now, I’m hungry and have to go somewhere else.